There are lots of websites out there (and other media) which use the "tv scanline" effect or other text effects to bring a "high tech" feel to an image. While the first reaction would be, "let's just draw some lines over the text", it's not quite as simple as that to achieve a good effect. But never fear! It's not difficult, it just takes a couple extra steps.
TV Scanlines[]
Graphics TutorialsIf you're using Macromedia Fireworks, this is dead simple. Set up your background and select a texture of either "Line-Horiz 1" or "Line-Horiz 2", depending on how bright your background is. Use the Fill Options on the text layer to select the same texture - but this time make it 100% texture and transparent. Boom, there you go. TV Scanlines, just like this: [Image:th_scanlines_00.jpg]]
But what if you're not using Fireworks? Don't despair. It's easy enough. We need to start out by making a bunch of lines.
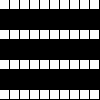
As you can see from the super-expanded versions above, we start out by making a white horizontal line and then replicating it downward every three pixels (white, nothing, nothing, white, and so on). These white lines should be on their own layer, of course! Then we duplicate the lines layer downward one, giving us two white and one blank. But we do want them on two different layers because we're going to apply opacity on the layers differently. For this sample, I went with 40% on the upper layer and 30% on the lower, which gives us the lines for the black background.

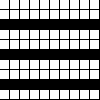
Now we put our text in place and duplicate the two lines layers and position the copies above the text. Then we use the INVERT command to turn the white lines to black lines. It'll look a bit weird at first, because you've got the black and white fighting over the background, but we're going to fix that with our next step.

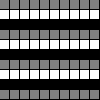
I've selected the two black line layers and "merged" them into one layer. Then, with that merged layer selected, I held down the Control key and clicked on the text layer. Both Fireworks and Photoshop have this ability - using the control key (option on Macs) to use a layer to create a marquee selection). I expect other editing tools with layers support can do it as well, though the manner of doing it might be different.

Then we just invert the selection (so we've selected everything BUT the text on the black lines layer) and delete it. The only thing that's missing now is the minor imperfections in a CRT caused by small differences in the phosphors. We can achieve this by adding a very faint, monochromatic "noise" effect to the text layer. And then you have our finished product:

Blurlines[]
An adaptation of the "TV Scanline" look is to do what I call "blurlines". It gives the feeling of scanlines, but rather than darkening, it creates the feel of "bleed" along lines. This effect is even easier.

We've already got our every-three 1-pixel lines as described above. This time we make them in the same color as the text. The next thing is to make the text into a bitmap layer. In Fireworks, just select the text layer and use the "Flatten Selection" item from the Modify menu. Then I hide the lines layer so I can better see what I'm doing.

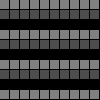
Again, I use the layer control-click to create a selection. This time, we're on the text layer, using the lines to create a selection. We want to hold down ALT (or Command on a Mac) to duplicate the selection as we move it. And all we're going to do is duplicate it one pixel to the left, the one pixel to the right as well, as shown below:


The last steps are as follows: re-select our lines and apply a very small gaussian blur to them - I used a half pixel blur for this example; show the lines layer again (behind the text); lower the opacity of the lines layer - I used 20%. And that gives us our final effect: